
Container Gardening for Every Space: Garden Methods, Space Planning, and a DIY Self-Watering Planter
Container gardening for every space. Container Gardening for Every Space: Garden Methods, Space Planning, and a DIY Self-Watering Planter . Do it for your household and retain some peace of mind about the foods you eat.
BODYSEEDBANK369PREPAREDNESSHEALTHGARDEN/HOME
C. Colson
5/29/20264 min read


Container Gardening for Every Space: Methods, Space Planning, and a DIY Self-Watering Planter
Intro
Container gardening turns small spaces into productive, beautiful gardens. Whether you live in an apartment, have a balcony, or want to maximize sunny spots in a yard, containers let you grow food, herbs, and pollinator-friendly flowers with less soil, fewer pests, and more control. At Seedbank369, we focus on sustainable, low-cost methods that center accessibility and community — this post covers container types, soil and watering methods, layout and space planning, recommended crops, seasonal care, and a detailed build for a durable self-watering planter you can make with common materials.
Why container gardening?
- Accessible: No heavy digging; raised soil level reduces bending.
- Space-efficient: Use vertical and micro-spaces to increase yield.
- Soil control: Avoid contaminated ground; tailor mixes for crops.
- Water-wise: Containers conserve water when designed properly.
- Mobile and modular: Rearrange plants for sun, shade, wind protection.
Choosing containers
- Size matters: Larger containers hold more moisture and support bigger roots. Aim for:
- Herbs: 6–8 inches (15–20 cm) depth, 1–3 gallon (4–11 L) pots.
- Leafy greens: 8–12 inches depth, 5 gallon (19 L) pots.
- Tomatoes, peppers: 12–24 inches depth, 10–20 gallon (38–76 L) containers.
- Root crops (carrots, beets): depth depends on variety; choose deep pots or grow in grow bags.
- Materials pros/cons:
- Plastic: Lightweight, inexpensive, retains moisture; choose food-safe plastics if growing edibles.
- Terracotta: Breathable, attractive, but dries quicker and can crack in freeze-thaw climates.
- Wood: Good insulation and looks, but use rot-resistant wood (cedar, redwood) and line with landscape fabric for longevity.
- Fabric grow bags: Excellent drainage and air pruning of roots; can dry faster so need more frequent watering.
- Upcycled containers: Buckets, barrels, crates — ensure drainage and food-safe liners.
- Drainage: Always include drainage holes except for purpose-built self-watering systems. Use saucers or trays to protect surfaces.
Soil and potting mix
- Aim for a light, well-draining, fertile mix. A basic recipe:
- 40% high-quality compost, 40% coconut coir or peat alternative (for moisture retention), 20% aeration (perlite, pumice, or coarse sand).
- Amendments:
- Slow-release organic fertilizer or balanced granular feed at planting.
- Rock phosphate or bone meal for root crops; kelp meal for trace minerals.
- Mycorrhizal inoculant can help root establishment in new containers.
- Avoid using garden soil alone — it compacts and hinders drainage.
Watering strategies
- Watering frequency depends on container size, material, temperature, and plant type. Larger and darker containers dry faster.
- Morning watering is best to reduce disease risk and allow plants to access moisture through the day.
- Signs of underwatering: wilting, dry soil pulling away from pot edges, stunted growth. Overwatering signs: yellowing, root rot smell, soggy soil.
- Mulch the surface with straw, shredded leaves, or bark to reduce evaporation.
Space planning and layout
- Assess your light: Track sun exposure for a week; categorize areas as full sun (6+ hours), partial sun (3–6 hours), or shade (less than 3 hours).
- Match crops to light zones:
- Full sun: tomatoes, peppers, eggplant, basil, sunflowers.
- Partial sun: lettuce, spinach, Swiss chard, beets.
- Shade: mint, parsley, some herbs, leafy greens in summer.
- Vertical gardening: Use trellises, cages, obelisks, or wall-planters to multiply space. Vining crops — cucumbers, pole beans, indeterminate tomatoes — can be trained upward.
- Grouping by water needs: Place plants with similar moisture requirements together to avoid over- or under-watering.
- Accessibility and airflow: Leave space to reach and harvest, and space between containers to reduce disease and allow light penetration.
- Succession planting: Plan for sequential plantings to maximize year-round production (e.g., follow early lettuce with heat-tolerant peppers).
Crop recommendations for containers
- Best beginner crops: cherry tomatoes, basil, lettuce mixes, spinach, radishes, bush beans, peppers, chives, oregano.
- High-yield, space-savvy choices: determinate tomatoes, dwarf varieties, vertical cucumbers, compact pepper varieties, salad greens in succession.
- Companion planting: Pair herbs with vegetables to deter pests and improve flavor; e.g., basil with tomatoes, marigolds for nematode deterrence (benefit debated).
Pest and disease management
Building a self-watering planter: overview
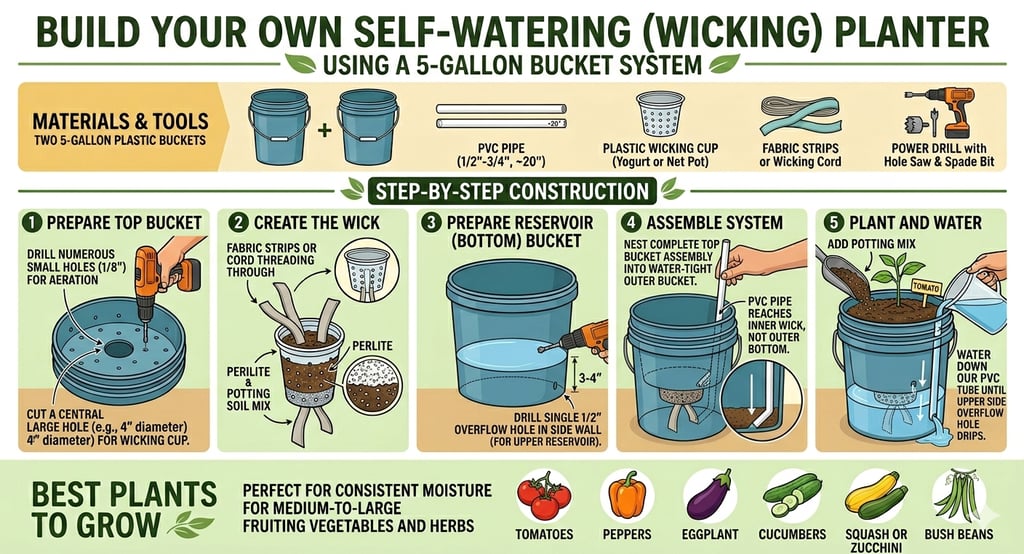
Self-watering planters reduce watering frequency, stabilize moisture, and help plants thrive in hot or mobile situations. Below is a detailed plan 5 gallon DIY self-watering planter using affordable materials.
5 gallon bucket self water planter
A 5-gallon bucket self-watering planter (or "wicking" bucket) uses two nested buckets: a top bucket for soil and plants, and a bottom bucket that acts as a water reservoir. The soil draws water up from the bottom as needed, keeping plants perfectly hydrated for days without daily watering. Materials Needed
Two 5-gallon plastic buckets (food-grade is recommended for edibles).
One 1/2-inch or 3/4-inch PVC pipe (about 18–20 inches long) to act as a watering tube.
A plastic cup (e.g., a yogurt cup or net pot) to act as the wicking basket.
Strips of cotton or polyester fabric, or a length of polyester wicking cord.
Drill with a hole saw or spade bit.
Step-by-Step Construction
1. Prepare the Top Bucket
Drill multiple small holes (about \(1/8\) inch) in the bottom of the top bucket for aeration and water absorption. In the very center, cut a larger hole that matches the size of your plastic cup.
2. Create the Wick
Take your plastic cup and drill several holes in its sides and bottom. Place it into the center hole of your top bucket. Stuff the cup and surround it with a mix of perlite and potting soil, and thread your wicking cords through the cup's holes so they dangle down. This acts as an anchor to draw water into the upper soil.
3. Prepare the Reservoir (Bottom) Bucket
Measure about 3 to 4 inches up from the bottom of the second bucket and drill a single \(1/2\)-inch hole. This will act as your overflow drain, ensuring the water level never gets too high and drowns the plant roots.
4. Assemble the System
Cut a slight angle at the bottom of your PVC pipe so it can sit in the bottom bucket without being blocked. Stack the top bucket inside the bottom one, letting the PVC pipe stand vertically against the inside edge, passing through a hole in the top bucket.
5. Plant and Water
Fill the top bucket with quality potting mix. Place your plant in the center. To use, pour water through the PVC fill tube until water drains out of the side overflow hole. Top off the reservoir when empty.
Best Plants to Grow
Self-watering buckets are perfect for medium-to-large fruiting vegetables and herbs that require consistent moisture.
Tomatoes
Peppers
Eggplant
Squash or Zucchini
Cucumbers
Bush beans
SOCIAL MEDIA
© 2026. All rights reserved. SEEDBANK369
Instagram-YouTube-Blue Sky
SEEDBANK 369 POLICY INFO